- 1. 准备工作
- 2. 安装 bootstrap-loader
- 3. 使用
- 3.1 创建 .bootstraprc 文件
- 3.2 创建 webpack.bootstrap.config.js 文件
- 3.3 引用 boostrap 的 webpack 配置
- 4. 优化目录结构
这节主要来实践如何加载和打包 Twitter Bootstrap 框架。
1. 准备工作
先来复制一些 bootstrap 的代码片断。
src/index.html
<!DOCTYPE html><html lang="en"><head><meta charset="UTF-8"><title></title></head><body><button type="button" class="btn btn-default" aria-label="Left Align"><span class="glyphicon glyphicon-align-left" aria-hidden="true"></span></button><button type="button" class="btn btn-default btn-lg"><span class="glyphicon glyphicon-star" aria-hidden="true"></span> Star</button><!-- Button trigger modal --><button type="button" class="btn btn-primary btn-lg" data-toggle="modal" data-target="#myModal">Launch demo modal</button><!-- Modal --><div class="modal fade" id="myModal" tabindex="-1" role="dialog" aria-labelledby="myModalLabel"><div class="modal-dialog" role="document"><div class="modal-content"><div class="modal-header"><button type="button" class="close" data-dismiss="modal" aria-label="Close"><span aria-hidden="true">×</span></button><h4 class="modal-title" id="myModalLabel">Modal title</h4></div><div class="modal-body">...</div><div class="modal-footer"><button type="button" class="btn btn-default" data-dismiss="modal">Close</button><button type="button" class="btn btn-primary">Save changes</button></div></div></div></div></body></html>
注意,本节使用的是 bootstrap 3,因为目前写这篇文章时,bootstrap 4 还没出正式版,所以我们用 bootstrap 3。
效果如下:
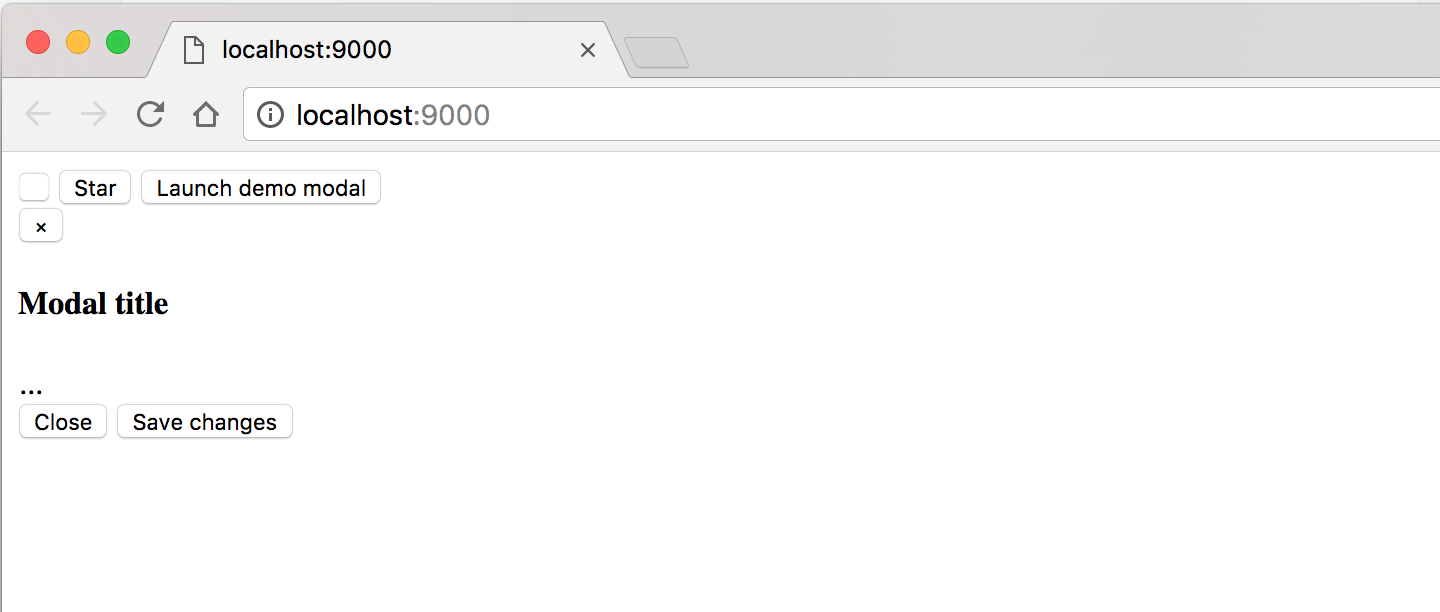
图标没显示出来,css 也没加载到,js 更是不可用。
2. 安装 bootstrap-loader
要加载 bootstrap 框架,主要是使用这个这个 loader:bootstrap-loader。
现在主要通过查看它的官方文档,来了解如何安装和使用它。
安装。
$ npm install bootstrap-loader --save-dev$ npm install resolve-url-loader url-loader --save-dev
3. 使用
接下来,我们来看如何使用 bootstrap-loader 这个 loader。
3.1 创建 .bootstraprc 文件
在项目根目录下,创建 .bootstraprc 文件,其内容拷贝于下面这个链接的内容。
.bootstraprc-3-default
这个内容是官方提供的,主要存放的是 bootstrap 的配置选项,就是通过它来控制一些 bootstrap 的功能。
3.2 创建 webpack.bootstrap.config.js 文件
然后在项目根目录下,创建 webpack.bootstrap.config.js 文件,其内容拷贝于下面这个链接的内容。
webpack.bootstrap.config.js
这个内容是官方提供的,主要存放的是关于 bootstrap 的 webpack 配置的内容,它包含生产环境和开发环境的配置。
3.3 引用 boostrap 的 webpack 配置
现在我们把刚才下载的 webpack.bootstrap.config.js 文件利用起来。
webpack.config.js
const bootstrapEntryPoints = require('./webpack.bootstrap.config')var bootstrapConfig = isProd ? bootstrapEntryPoints.prod : bootstrapEntryPoints.dev;module.exports = {entry: {"app.bundle": './src/app.js',"contact": './src/contact.js',"bootstrap": bootstrapConfig},...}
运行一下 npm run dev,发现报了个错。
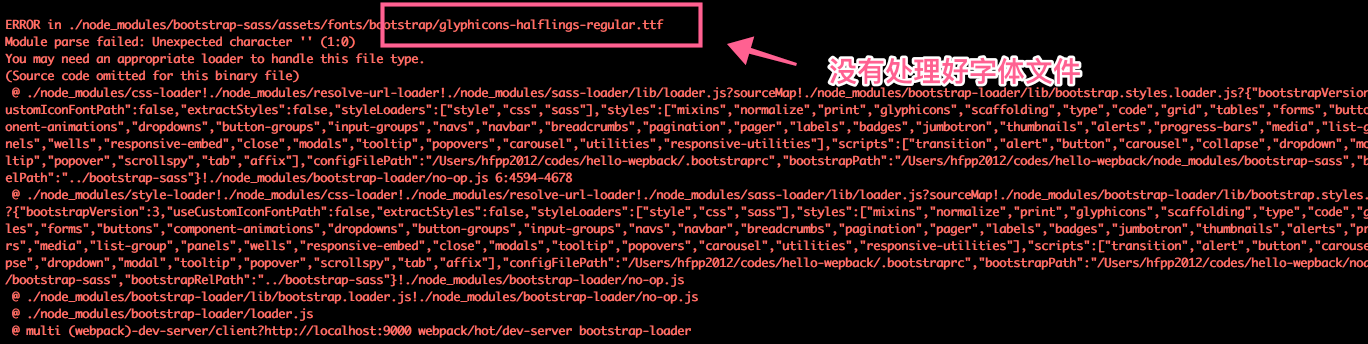
字体文件没处理好。
通过查看 bootstrap-loader 官方的 readme 文档,加上下面几行 loader 的配置,可解决问题。
module: {loaders: [{ test: /\.(woff2?|svg)$/, loader: 'url-loader?limit=10000' },{ test: /\.(ttf|eot)$/, loader: 'file-loader' },],},
再次运行 npm run dev,发现下面的页面效果。
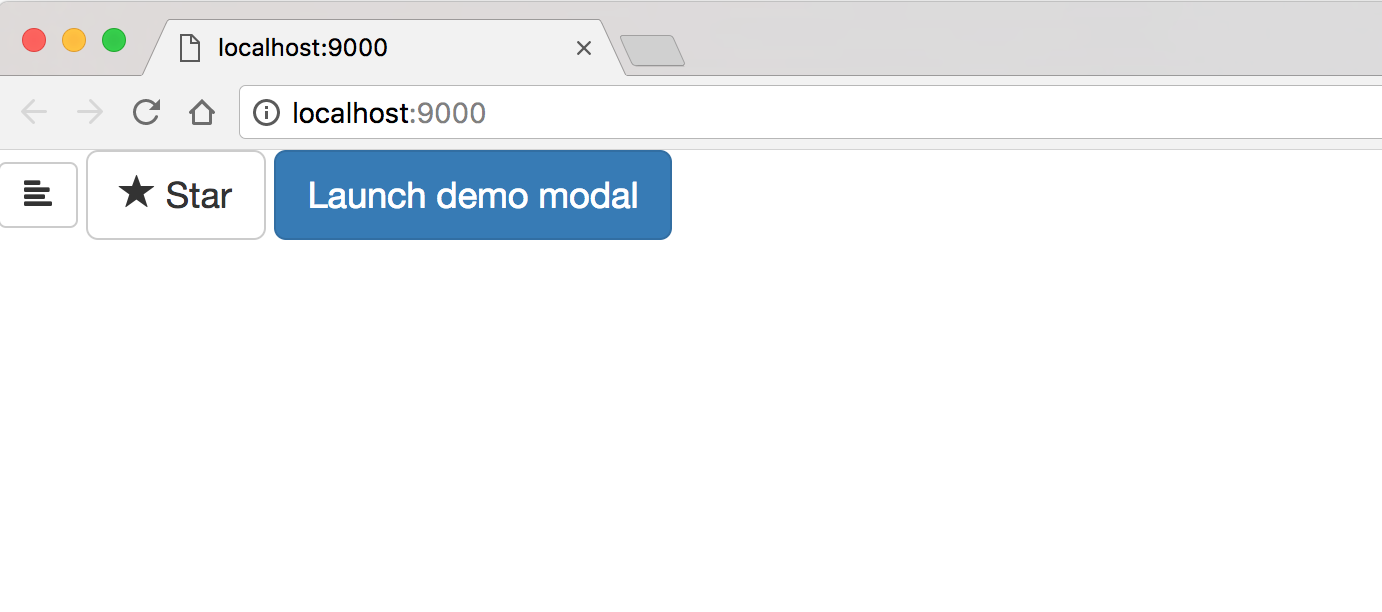
字体图标和 css 都没问题了,但是 js 没加载好,点击按钮没有弹出模态框。
查看报错:
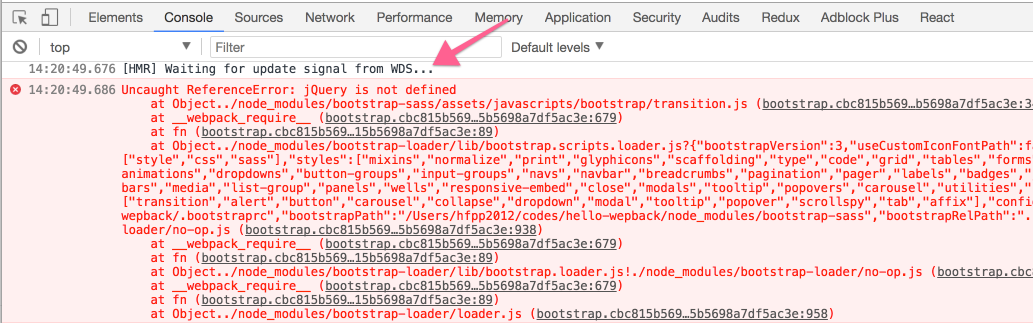
原来是 jquery 没加载到。
在 webpack.config.js 配置文件的 loader 部分加上下面这行:
{ test:/bootstrap-sass[\/\\]assets[\/\\]javascripts[\/\\]/, loader: 'imports-loader?jQuery=jquery' },
然后在终端上执行下面的命令:
$ npm install --save-dev imports-loader jquery
即可解决问题。
效果:
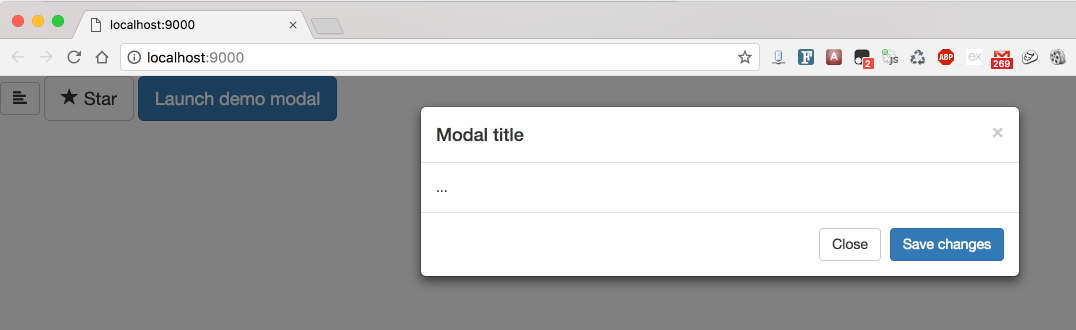
点击按钮后,模态框弹出来了,good!
4. 优化目录结构
我们运行一下 npm run prod 命令,没啥问题,目录结构是下面这样的:
dist├── 448c34a56d699c29117adc64c43affeb.woff2├── 89889688147bd7575d6327160d64e760.svg├── app.bundle.f3ffd242134090bbd4b7.js├── b86262bb1045a2b16a4d9fcf64afc1b1.svg├── bootstrap.f3ffd242134090bbd4b7.js├── contact.f3ffd242134090bbd4b7.js├── contact.html├── e18bbf611f2a2e43afc071aa2f4e1512.ttf├── f4769f9bdb7466be65088239c12046d1.eot├── fa2772327f55d8198301fdb8bcfc8158.woff├── images│ ├── glyphicons-halflings-regular.svg│ └── money-bag.svg├── index.html└── style.css
比较乱,如果能把 css,js,字体文件分开成各个目录就蛮好的。
我们来改一下配置:
webpack.config.js
// css 文件放到 css 目录中new ExtractTextPlugin({filename: '[name].css',disable: !isProd,publicPath: 'css/'}),// 字体文件都放到 fonts 目录中{ test: /\.(woff2?|svg)$/, loader: 'url-loader?limit=10000&name=[name].[ext]&outputPath=fonts/' },{ test: /\.(ttf|eot)$/, loader: 'file-loader?name=[name].[ext]&outputPath=fonts/' },
运行 npm run prod 之后,dist 的目录结构如下:
dist├── app.bundle.0cc9d9267f555d83ccb0.js├── bootstrap.0cc9d9267f555d83ccb0.js├── contact.0cc9d9267f555d83ccb0.js├── contact.html├── css│ ├── app.bundle.css│ └── bootstrap.css├── fonts│ ├── glyphicons-halflings-regular.eot│ ├── glyphicons-halflings-regular.svg│ ├── glyphicons-halflings-regular.ttf│ ├── glyphicons-halflings-regular.woff│ ├── glyphicons-halflings-regular.woff2│ └── money-bag.svg├── images│ ├── glyphicons-halflings-regular.svg│ └── money-bag.svg└── index.html
这样目录结构就比刚才清晰多了。
先说这么多吧。
